

Setting up Okta
Overview
Section titled “Overview”This guide walks you through configuring Okta as your identity provider for DeepIntShield Enterprise. After completing this setup, your users will be able to sign in to DeepIntShield using their Okta credentials, with roles and team memberships automatically synchronized.
Prerequisites
Section titled “Prerequisites”- An Okta organization with admin access
- DeepIntShield Enterprise deployed and accessible
- The redirect URI for your DeepIntShield instance (e.g.,
https://your-deepintshield-domain.com/login)
Step 1: Create an OIDC Application
Section titled “Step 1: Create an OIDC Application”- Log in to the Okta Admin Console
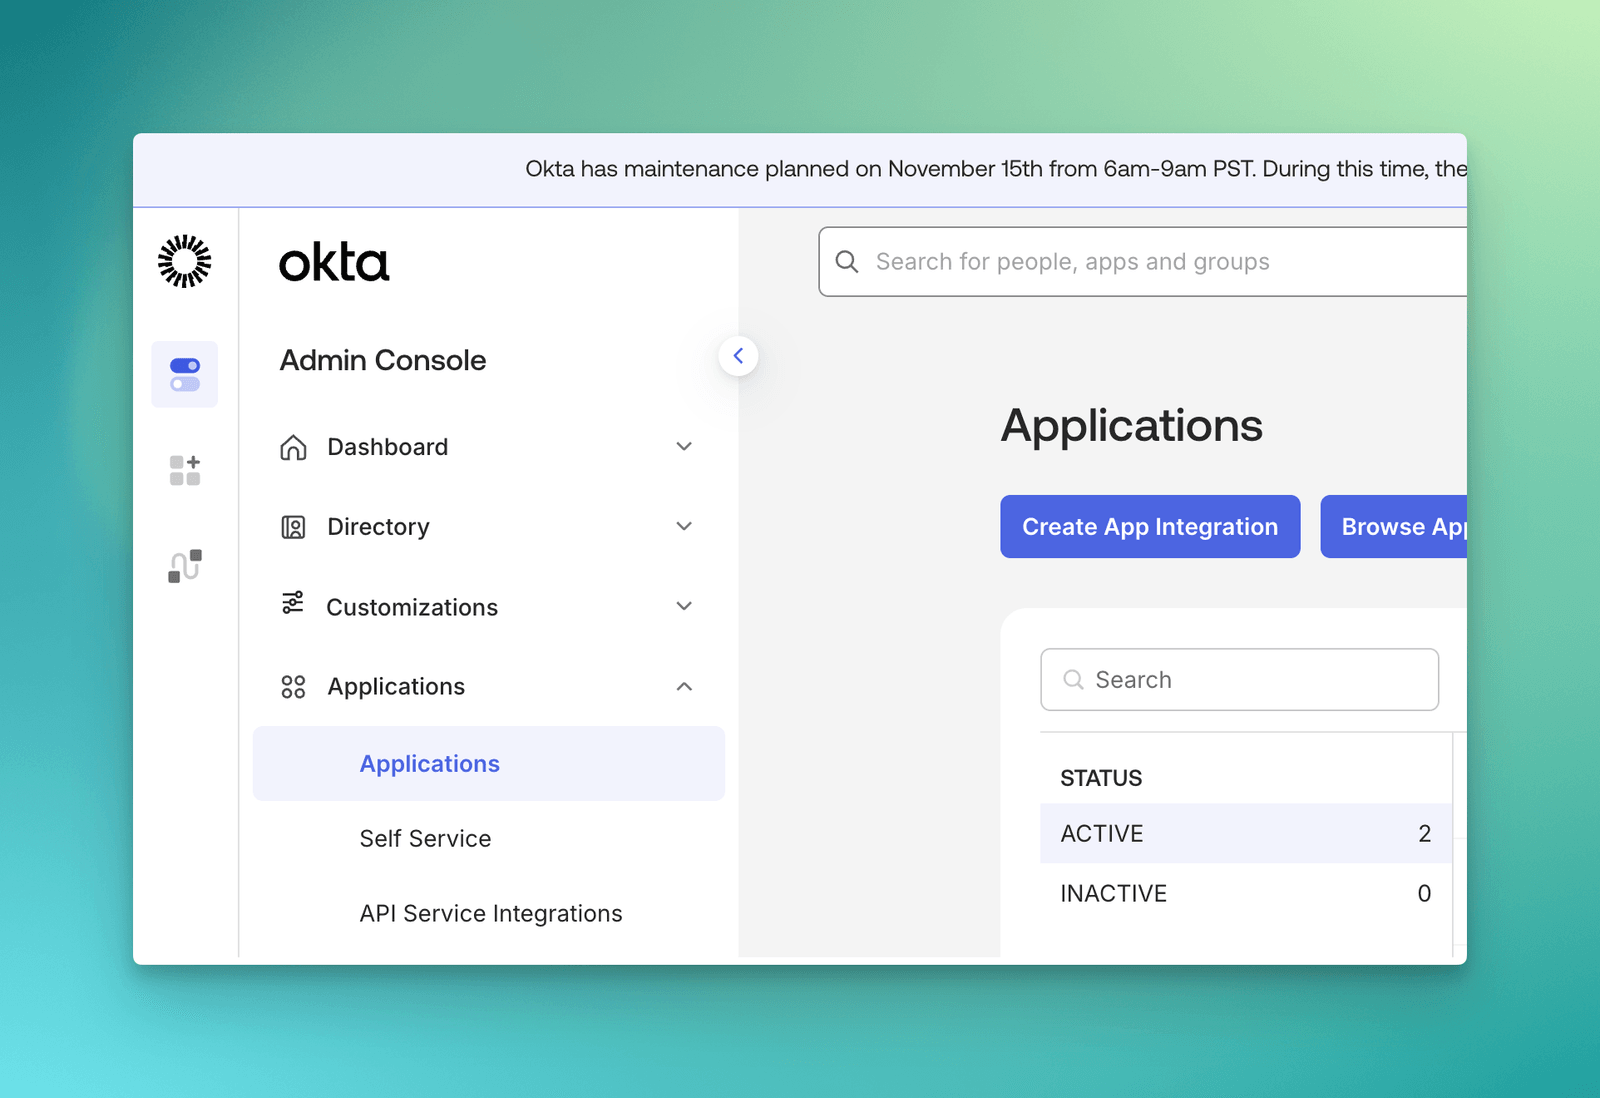
- Navigate to Applications → Applications
- Click Create App Integration
- In the dialog, select:
- Sign-in method: OIDC - OpenID Connect
- Application type: Web Application
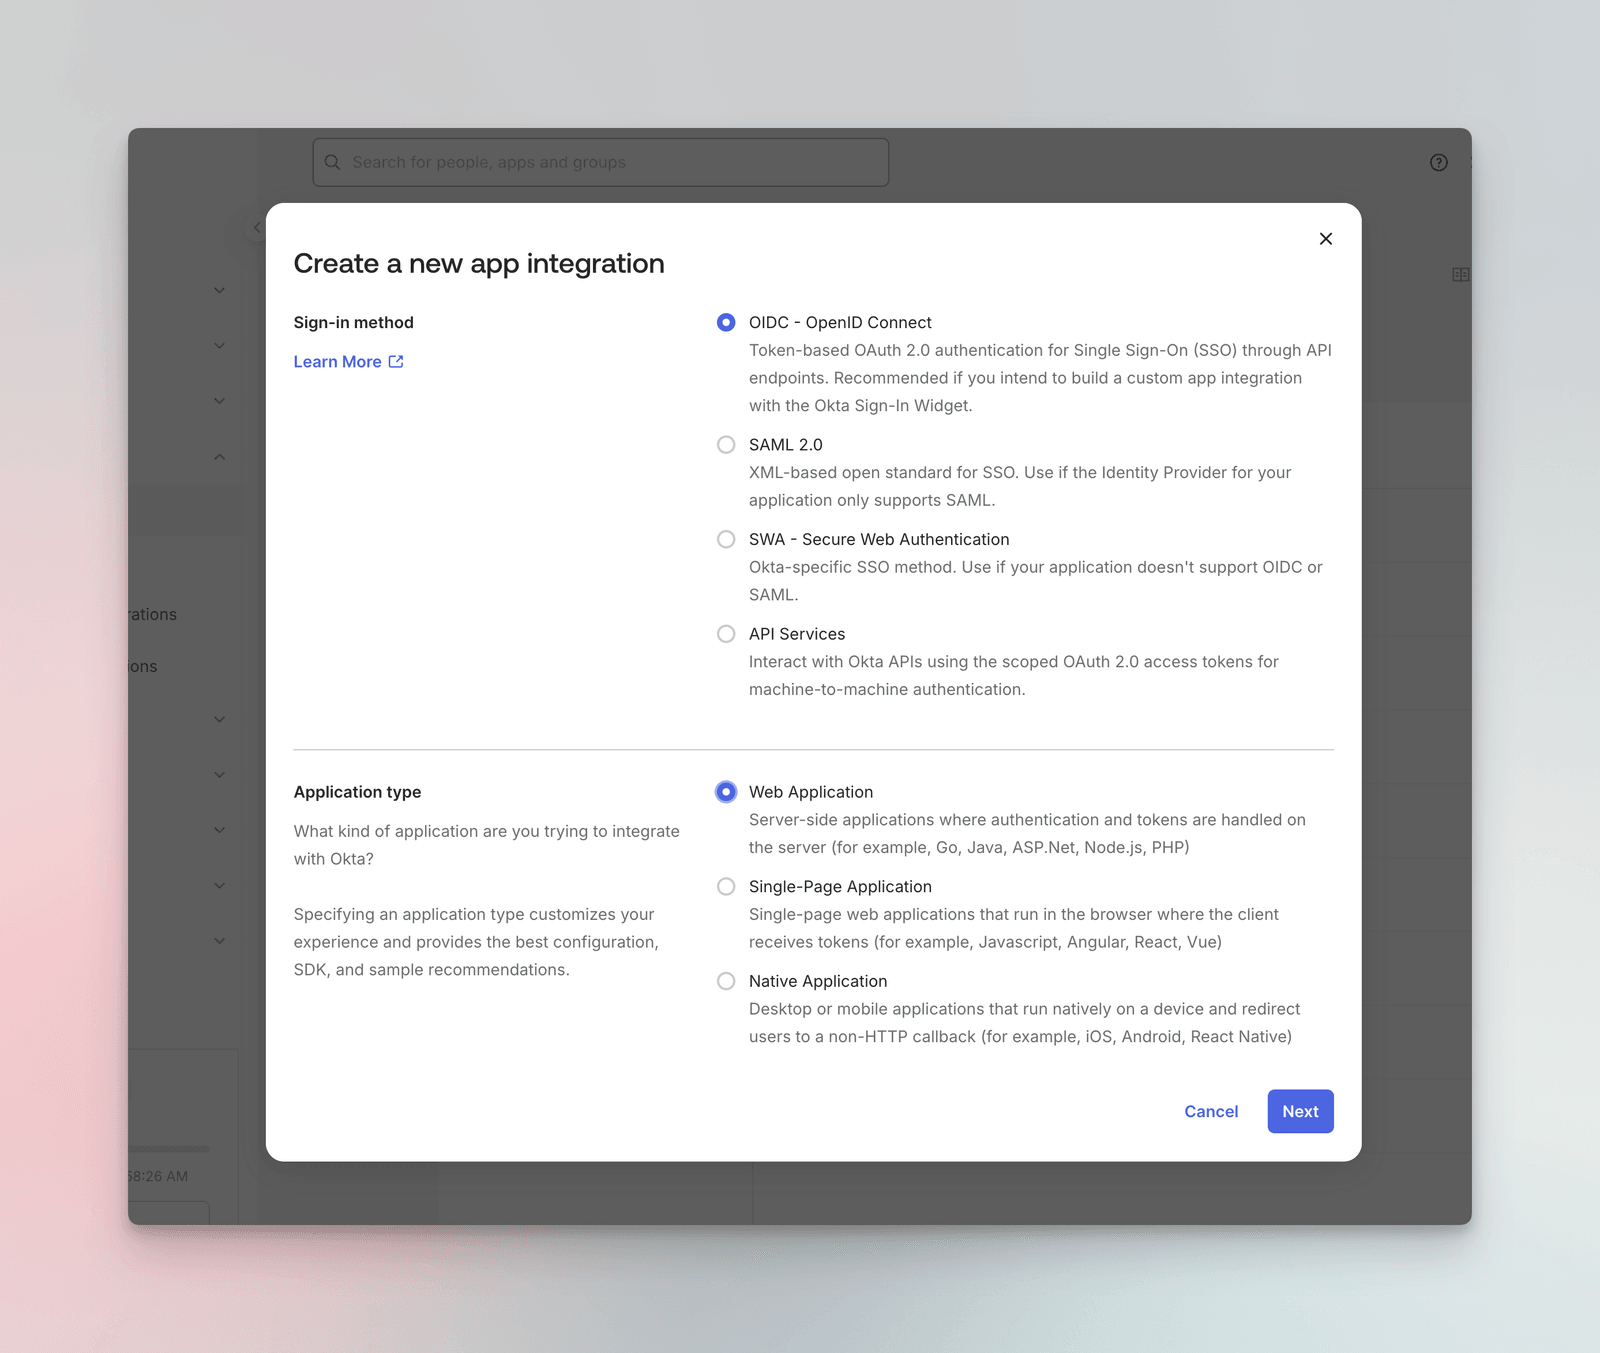
- Click Next to continue
Step 2: Configure Application Settings
Section titled “Step 2: Configure Application Settings”Configure the following settings for your application:
General Settings:
- App integration name:
DeepIntShield Enterprise - Logo (optional): Upload your DeepIntShield logo image so the application is easy to recognize
Grant type:
- Enable Authorization Code
- Enable Refresh Token
Sign-in redirect URIs:
- Add your DeepIntShield login callback URL:
https://your-deepintshield-domain.com/login
Sign-out redirect URIs (Optional):
- Add your DeepIntShield base URL:
https://your-deepintshield-domain.com
Assignments:
- Choose Skip group assignment for now (we’ll configure this later)
-
Click Save to create the application
-
After saving, note down the following from the General tab:
- Client ID
- Client Secret (click to reveal)
Step 3: Configure Authorization Server (optional)
Section titled “Step 3: Configure Authorization Server (optional)”DeepIntShield uses Okta’s Authorization Server to issue tokens. You have three options:
-
Use
/oauth2/defaultwith role claims (recommended) - Complete Steps 4-7 to configure custom role claims on the default authorization server. This enables automatic RBAC synchronization. -
Use
/oauth2/defaultwithout role claims - Skip Steps 4-7. The first user to sign in automatically receives the Admin role and can manage RBAC for all subsequent users through the DeepIntShield dashboard. -
Skip Step 3 entirely - Authorization is not configured through Okta. You’ll need an alternative authentication mechanism.
Configuring the Authorization Server
Section titled “Configuring the Authorization Server”-
Navigate to Security → API
-
Click on Authorization Servers
-
Note the Issuer URI for your authorization server (e.g.,
https://your-domain.okta.com/oauth2/default)
Step 4: Create Custom Role Attribute
Section titled “Step 4: Create Custom Role Attribute”To map Okta users to DeepIntShield roles, you need to create a custom attribute.
-
Navigate to Directory → Profile Editor
-
Click on your application’s user profile (e.g., DeepIntShield Enterprise User)
-
Click Add Attribute
-
Configure the attribute:
| Field | Value |
|---|---|
| Data type | string |
| Display name | deepintshieldRole |
| Variable name | deepintshieldRole |
| Enum | Check “Define enumerated list of values” |
| Attribute members | Admin → admin, Viewer → viewer |
| Attribute type | Personal |
- Click Save
Step 5: Add Role Claim to Tokens
Section titled “Step 5: Add Role Claim to Tokens”Configure the authorization server to include the role in the access token.
- Navigate to Security → API → Authorization Servers
- Click on your authorization server (e.g., default)
- Go to the Claims tab
- Click Add Claim
Configure the claim:
| Field | Value |
|---|---|
| Name | role |
| Include in token type | Access Token, Always |
| Value type | Expression |
| Value | user.deepintshieldRole |
| Include in | Any scope |
- Click Create
Step 6: Configure Groups for Team and Role Synchronization
Section titled “Step 6: Configure Groups for Team and Role Synchronization”DeepIntShield can automatically sync Okta groups for two purposes:
- Team synchronization - Groups are synced as DeepIntShield teams
- Role mapping - Groups can be mapped to DeepIntShield roles (Admin or Viewer) using Group-to-Role Mappings in the DeepIntShield UI
Create Groups in Okta
Section titled “Create Groups in Okta”-
Navigate to Directory → Groups
-
Click Add group
-
Create groups that correspond to your teams or roles (e.g.,
deepintshield-staging-admins,deepintshield-staging-viewers)
Add Groups Claim to Tokens
Section titled “Add Groups Claim to Tokens”You have two options for configuring the groups claim. Choose the one that best fits your Okta plan and requirements.
Option A: Using App-Level Groups Claim (All Okta Plans)
Section titled “Option A: Using App-Level Groups Claim (All Okta Plans)”This approach configures the groups claim directly in your application’s settings and works with all Okta plans, including free tiers.
-
Navigate to your application’s Sign On tab
-
Scroll down to the OpenID Connect ID Token section
-
Click Edit to modify the settings
-
Configure the Groups claim filter:
- Groups claim type: Filter
- Groups claim filter: Set a claim name (e.g.,
groups) and filter condition (e.g., “Starts with”deepintshield-staging)
-
Click Save
Option B: Using Authorization Server Groups Claim
Section titled “Option B: Using Authorization Server Groups Claim”This approach adds the groups claim through your authorization server, providing more flexibility for complex configurations.
- Navigate to Security → API → Authorization Servers
- Select your authorization server (e.g., default)
- Go to the Claims tab
- Click Add Claim
Configure the groups claim:
| Field | Value |
|---|---|
| Name | groups |
| Include in token type | ID Token, Always |
| Value type | Groups |
| Filter | Matches regex: .* (or specify a prefix like deepintshield-.*) |
| Include in | Any scope |
- Click Create
You can also configure an additional groups claim in the application’s Sign On settings:
-
Navigate to your application’s Sign On tab
-
Under OpenID Connect ID Token, configure:
- Groups claim type: Expression
- Groups claim expression:
Arrays.flatten(Groups.startsWith("OKTA", "deepintshield", 100))
Step 7: Assign Users to the Application
Section titled “Step 7: Assign Users to the Application”-
Navigate to your application’s Assignments tab
-
Click Assign → Assign to People or Assign to Groups
-
For each user, set deepintshieldRole to
adminorviewerfor the access level they need. -
Click Save and Go Back
Step 8: Configure DeepIntShield
Section titled “Step 8: Configure DeepIntShield”Now configure DeepIntShield to use Okta as the identity provider.
Using the DeepIntShield UI
Section titled “Using the DeepIntShield UI”- Navigate to SSO & SCIM Sync in your DeepIntShield dashboard
- Select Okta as the SCIM Provider
- Enter the following configuration:
| Field | Value |
|---|---|
| Client ID | Your Okta application Client ID |
| Issuer URL | Issuer URL |
| Audience | Your API audience (e.g., api://default or custom) |
| Client Secret | Your Okta application Client Secret (optional, for token revocation) |
- Toggle Enabled to activate the provider
- Click Save Configuration
Group-to-Role Mappings (Optional)
Section titled “Group-to-Role Mappings (Optional)”If you configured groups in Okta (Step 6), you can map Okta group names directly to DeepIntShield roles. This is an alternative to using custom role claims (Steps 4-5) and works with all Okta plans.
- In the User Provisioning configuration, scroll down to Group-to-Role Mappings
- Click Add Mapping
- Enter the Group Claim Name exactly as it appears in your Okta groups (e.g.,
deepintshield-staging-admins) - Select the corresponding Role (Admin or Viewer)
- Repeat for each group you want to map
| Group Claim Name | Role |
|---|---|
deepintshield-staging-admins | Admin |
deepintshield-staging-viewers | Viewer |
- Click Save Configuration
Configuration Reference
Section titled “Configuration Reference”| Field | Required | Description |
|---|---|---|
issuerUrl | Yes | Okta authorization server URL (e.g., https://your-domain.okta.com/oauth2/default) |
clientId | Yes | Application Client ID from Okta |
clientSecret | No | Application Client Secret (enables token revocation) |
audience | Yes | API audience identifier from your authorization server |
userIdField | No | JWT claim for user ID (default: uid) |
rolesField | No | JWT claim for roles (default: roles) |
teamIdsField | No | JWT claim for group/team IDs (default: groups) |
Testing the Integration
Section titled “Testing the Integration”- Open your DeepIntShield dashboard in a new browser or incognito window
- You should be redirected to Okta for authentication
- Log in with an assigned user
- After successful authentication, you’ll be redirected back to DeepIntShield
- Verify the user appears in the DeepIntShield users list with the correct role
Troubleshooting
Section titled “Troubleshooting”User not redirected to Okta
Section titled “User not redirected to Okta”- Verify the SCIM provider is enabled in DeepIntShield
- Check that the DeepIntShield server was restarted after configuration
- Ensure the Issuer URL is correct and accessible
”Invalid audience” error
Section titled “”Invalid audience” error”- Verify the
audiencefield matches your Okta authorization server’s audience - Check if you’re using a custom authorization server and update the issuer URL accordingly
Roles not syncing
Section titled “Roles not syncing”- Ensure the
roleclaim is configured in your authorization server - Verify users have the
deepintshieldRoleattribute set - Check that the claim is included in the access token (use Okta’s Token Preview feature)
Groups not appearing as teams
Section titled “Groups not appearing as teams”- Verify the
groupsclaim is configured in your authorization server - Ensure users are assigned to the relevant groups
- Check that groups are assigned to the application
Token refresh failing
Section titled “Token refresh failing”- Ensure the Refresh Token grant type is enabled for your application
- Verify the
offline_accessscope is included in your authorization requests
Next Steps
Section titled “Next Steps”- Audit Logs - Track sign-ins, configuration changes, and exports
- Role-Based Access Control - Understand the Admin and Viewer access levels
- Audit Logs - Monitor user authentication and activity