

Provider Configuration
Multi-Provider Setup
Section titled “Multi-Provider Setup”Configure multiple providers to switch by model prefix without rebuilding the gateway. DeepIntShield registers 29 built-in provider identities, including the following newly documented slices:
- DeepSeek: text, chat, Responses, discovery, and SSE.
- Amazon Bedrock Mantle: regional OpenAI-compatible chat, Responses lifecycle, compaction, embeddings, files, and token counting.
- Sarvam AI: multilingual chat, TTS, streaming speech, and transcription.
- Wafer: live per-model capabilities/pricing, chat, Responses, text, and bounded upload.
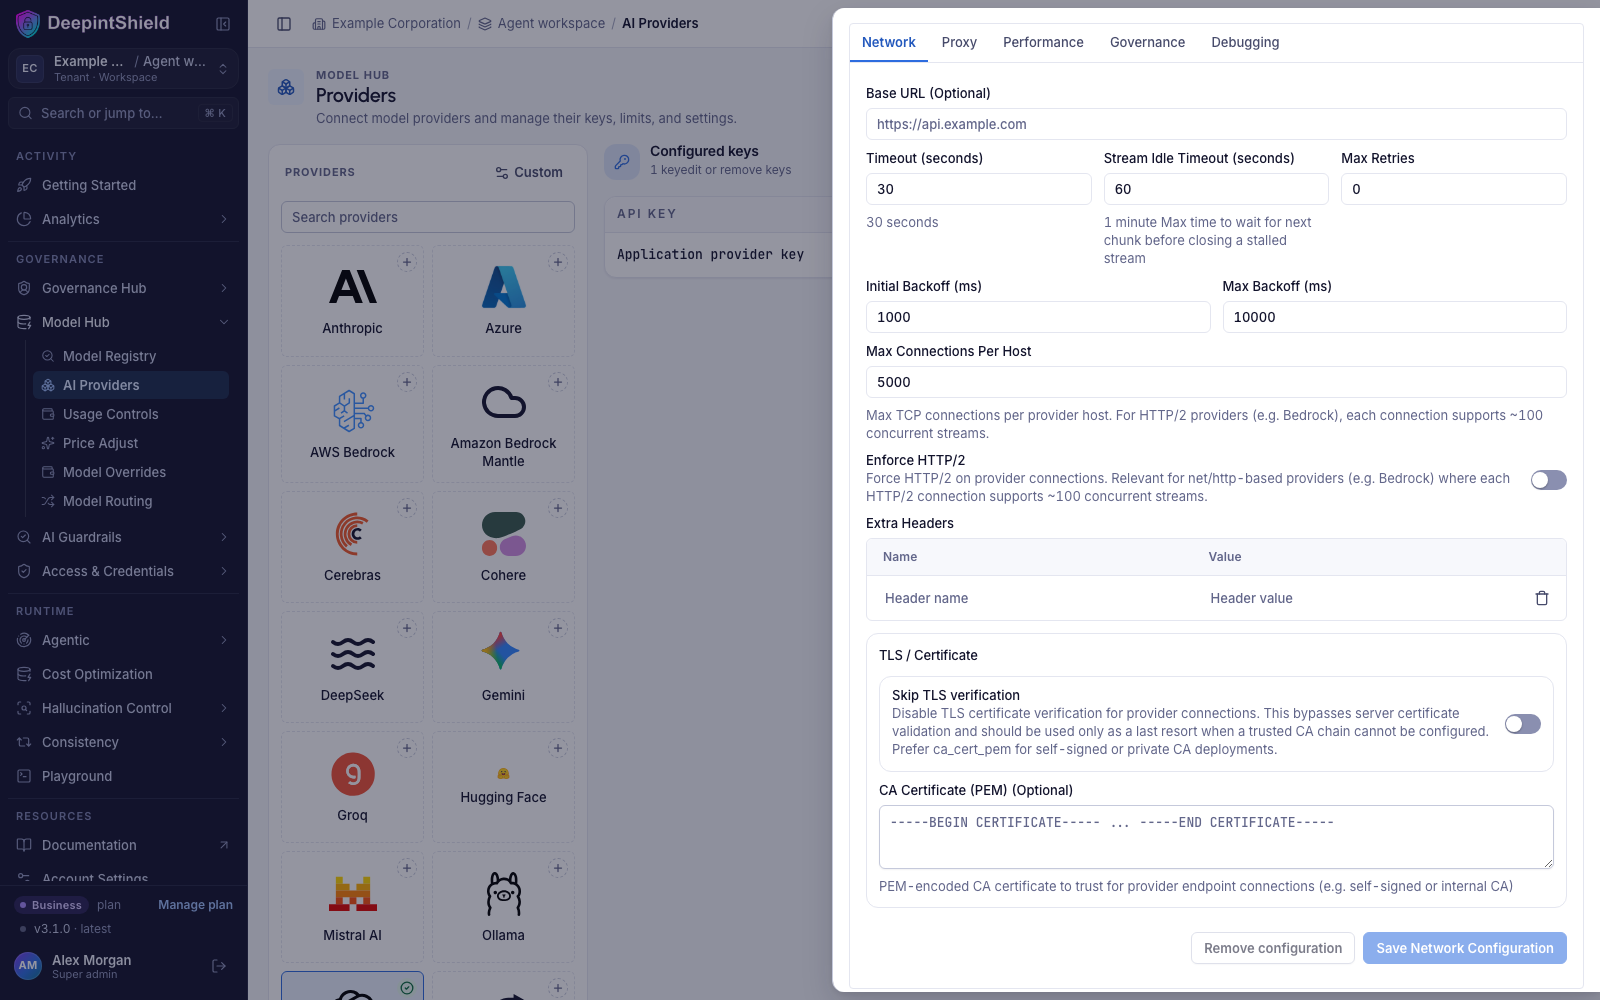
- Go to https://app.deepintshield.com
- Navigate to “Model Hub” → “AI Providers” in the sidebar
- Select a provider (e.g. OpenAI, Anthropic, Mistral) and add its API keys
- To add a self-hosted OpenAI-compatible server (e.g. vLLM), click Custom to add a custom provider, set its Base URL, and choose OpenAI as the Base Format
Making Requests
Section titled “Making Requests”Once providers are configured, you can make requests to any specific provider. This example shows how to send a request directly to OpenAI’s GPT-4o Mini model. DeepIntShield handles the provider-specific API formatting automatically.
curl --location 'https://app.deepintshield.com/v1/chat/completions' \--header 'Content-Type: application/json' \--header 'Authorization: Bearer sk-ds-your-virtual-key' \--data '{ "model": "openai/gpt-4o-mini", "messages": [ {"role": "user", "content": "Hello!"} ]}'Bare model names (automatic provider resolution)
Section titled “Bare model names (automatic provider resolution)”The provider/ prefix is optional. If you send a bare model name, DeepIntShield
resolves the provider from the model catalog automatically - so "model": "gpt-4o-mini"
routes to OpenAI, "gemini-2.5-flash" routes to Gemini, and so on. When a model is
served by more than one provider the choice is deterministic (OpenAI is preferred on
the OpenAI-compatible endpoints, otherwise the alphabetically-first match), and an
explicit provider/model prefix always takes precedence. If the catalog has no match
the request is rejected, so an unknown model never silently mis-routes.
# Same call, no provider prefix - resolved via the catalog--data '{ "model": "gpt-4o-mini", "messages": [{"role": "user", "content": "Hello!"}] }'Environment Variables
Section titled “Environment Variables”Set up your API keys for the providers you want to use. DeepIntShield supports both direct key values and environment variable references with the env. prefix:
export OPENAI_API_KEY="your-openai-api-key"export ANTHROPIC_API_KEY="your-anthropic-api-key"export MISTRAL_API_KEY="your-mistral-api-key"export CEREBRAS_API_KEY="your-cerebras-api-key"export GROQ_API_KEY="your-groq-api-key"export COHERE_API_KEY="your-cohere-api-key"export DEEPSEEK_API_KEY="your-deepseek-api-key"export AWS_BEARER_TOKEN_BEDROCK="your-short-lived-bedrock-api-key"export SARVAM_API_KEY="your-sarvam-api-key"export WAFER_API_KEY="your-wafer-api-key"Environment Variable Handling:
- Use
"value": "env.VARIABLE_NAME"to reference environment variables - Use
"value": "sk-proj-xxxxxxxxx"to pass keys directly - All sensitive data is automatically redacted in GET requests and UI responses for security
Advanced Configuration
Section titled “Advanced Configuration”Per-workspace & live: the provider network settings below - base URL, request timeout, retries, concurrency, proxy, TLS, and headers - are scoped to your workspace and applied per request. Saving a change takes effect on your next request with no restart, and one workspace’s settings never affect another.
Weighted Load Balancing
Section titled “Weighted Load Balancing”Distribute requests across multiple API keys or providers based on custom weights. This example shows how to split traffic 70/30 between two OpenAI keys, useful for managing rate limits or costs across different accounts.
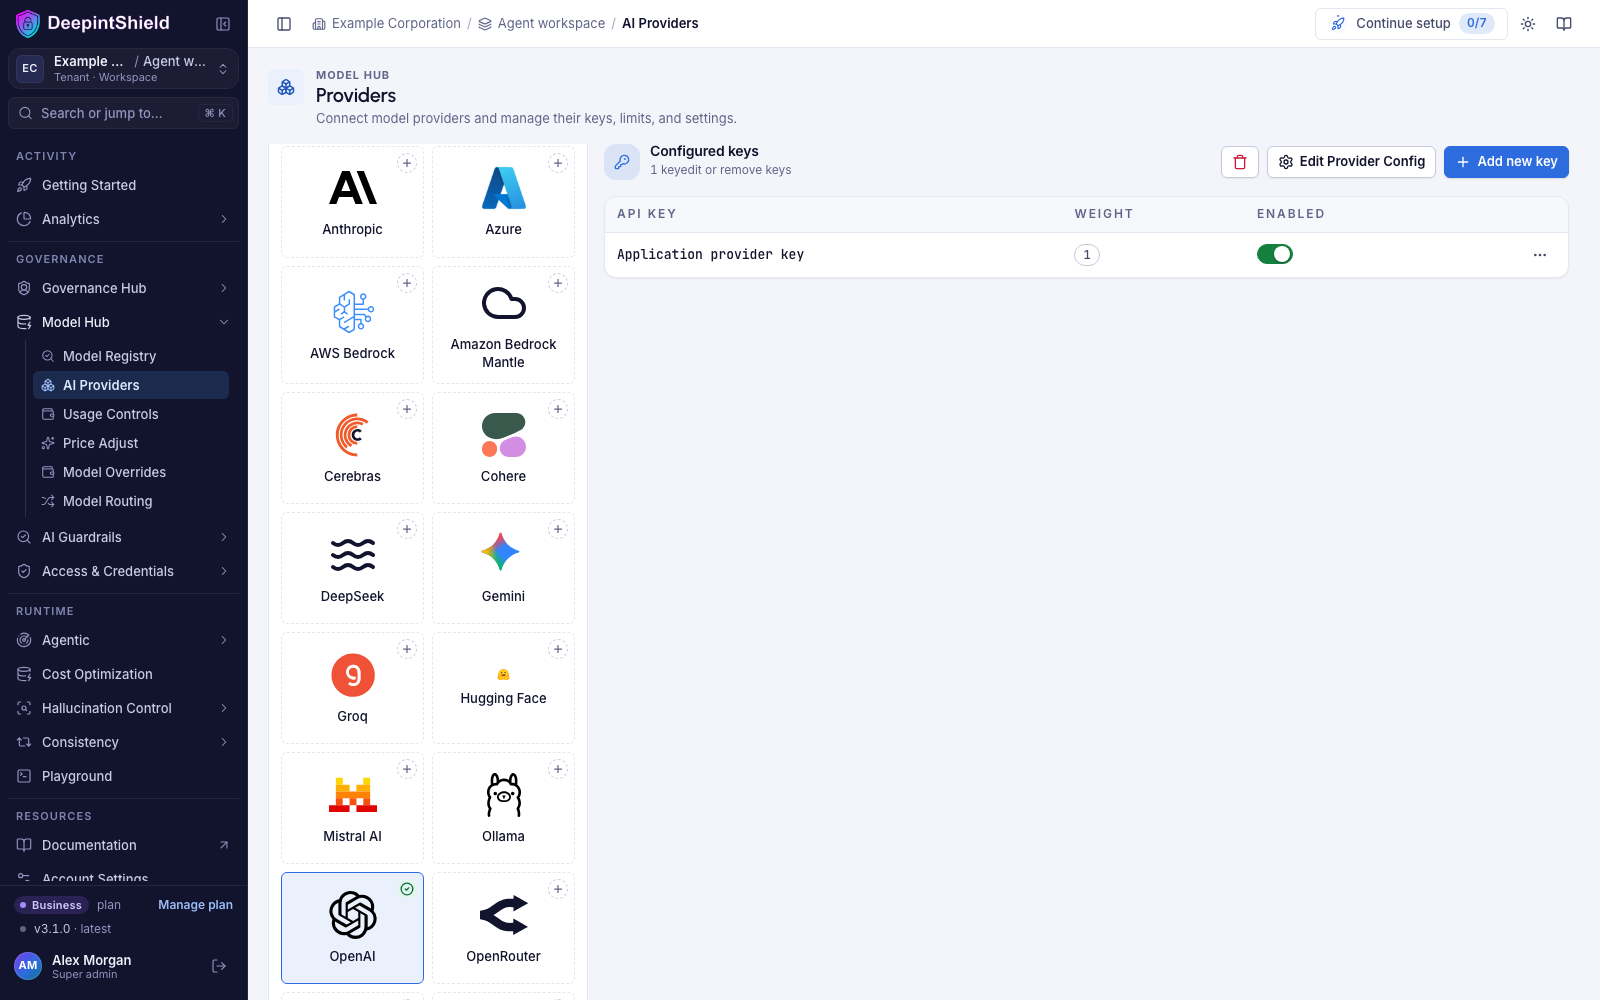
- Navigate to “Model Hub” → “AI Providers” → “OpenAI”
- Click “Add new key” to add multiple keys
- Set weight values (0.7 and 0.3)
- Save configuration
Model-Specific Keys
Section titled “Model-Specific Keys”Use different API keys for specific models, allowing you to manage access controls and billing separately. This example uses a premium key for advanced reasoning models (o1-preview, o1-mini) and a standard key for regular GPT models.
- Navigate to “Model Hub” → “AI Providers” → “OpenAI”
- Add first key with models:
["gpt-4o", "gpt-4o-mini"] - Add premium key with models:
["o1-preview", "o1-mini"] - Save configuration
Custom Base URL
Section titled “Custom Base URL”Override the default API endpoint for a provider. This is useful for connecting to self-hosted models, local development servers, or OpenAI-compatible APIs like vLLM, Ollama, or LiteLLM.
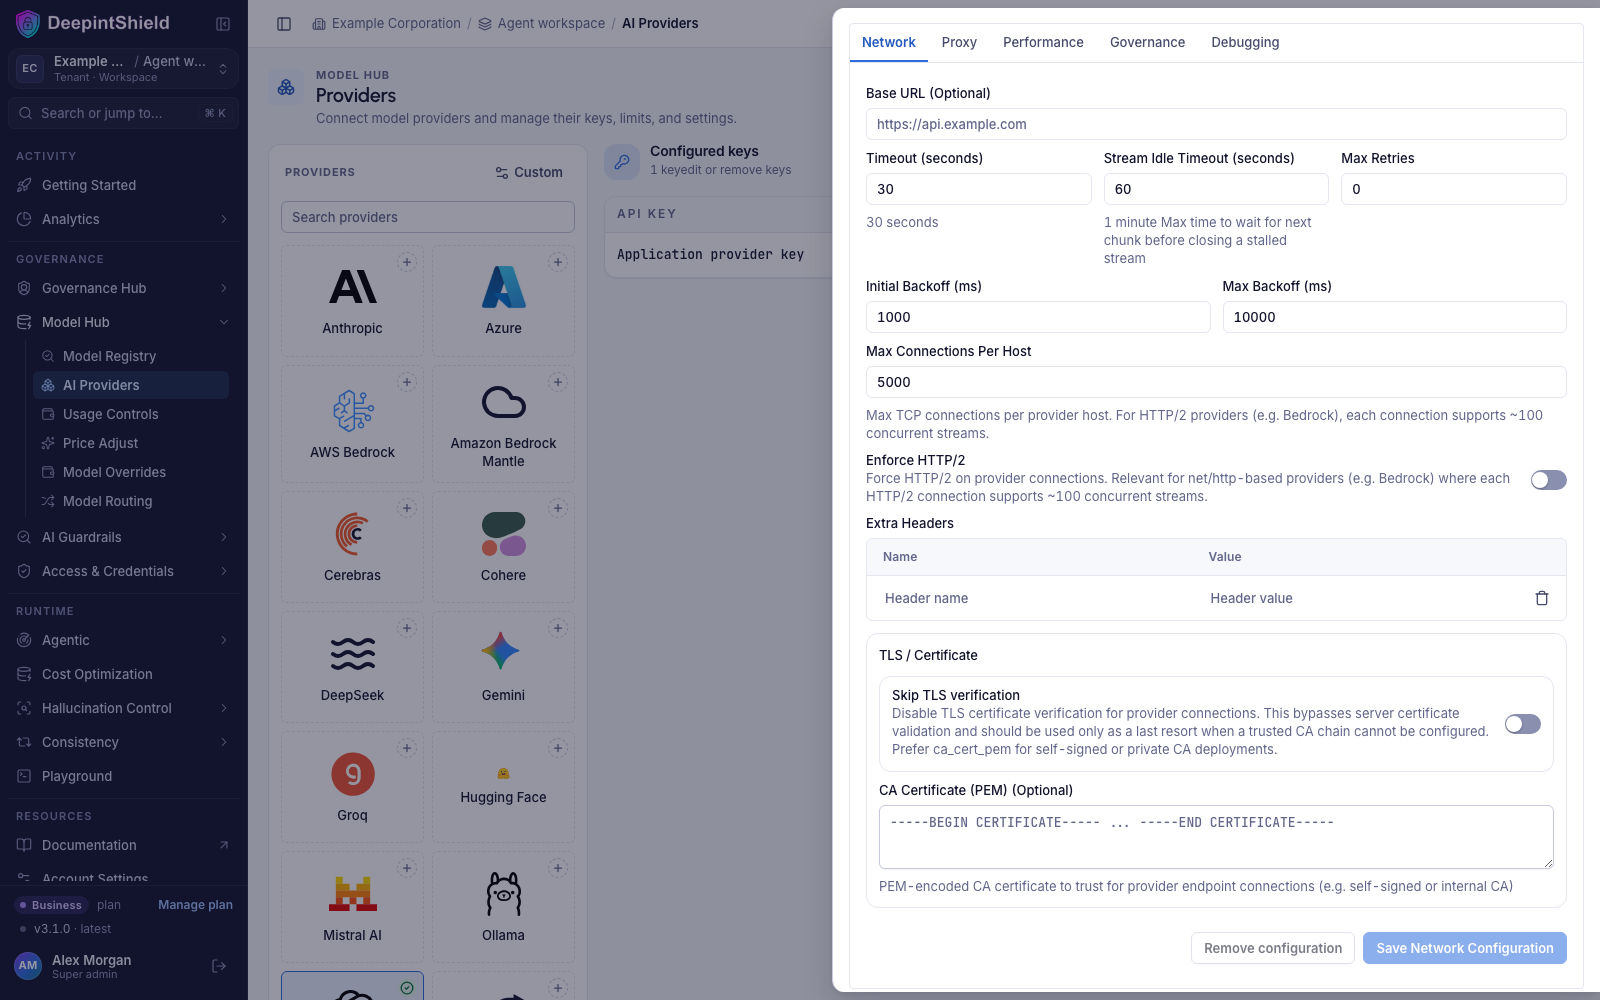
- Navigate to “Model Hub” → “AI Providers” → “OpenAI” → “Edit Provider Config” → “Network”
- Set Base URL:
https://your-custom-endpoint.example.com/v1 - Save configuration
Amazon Bedrock Mantle is regional. It defaults to
https://bedrock-mantle.us-east-1.api.aws; set the regional Mantle endpoint for
any other AWS Region. Do not configure the Bedrock Runtime hostname for the
bedrock-mantle provider identity.
Managing Retries
Section titled “Managing Retries”Configure retry behavior for handling temporary failures and rate limits. This example sets up exponential backoff with up to 5 retries, starting with 1ms delay and capping at 10 seconds - ideal for handling transient network issues.
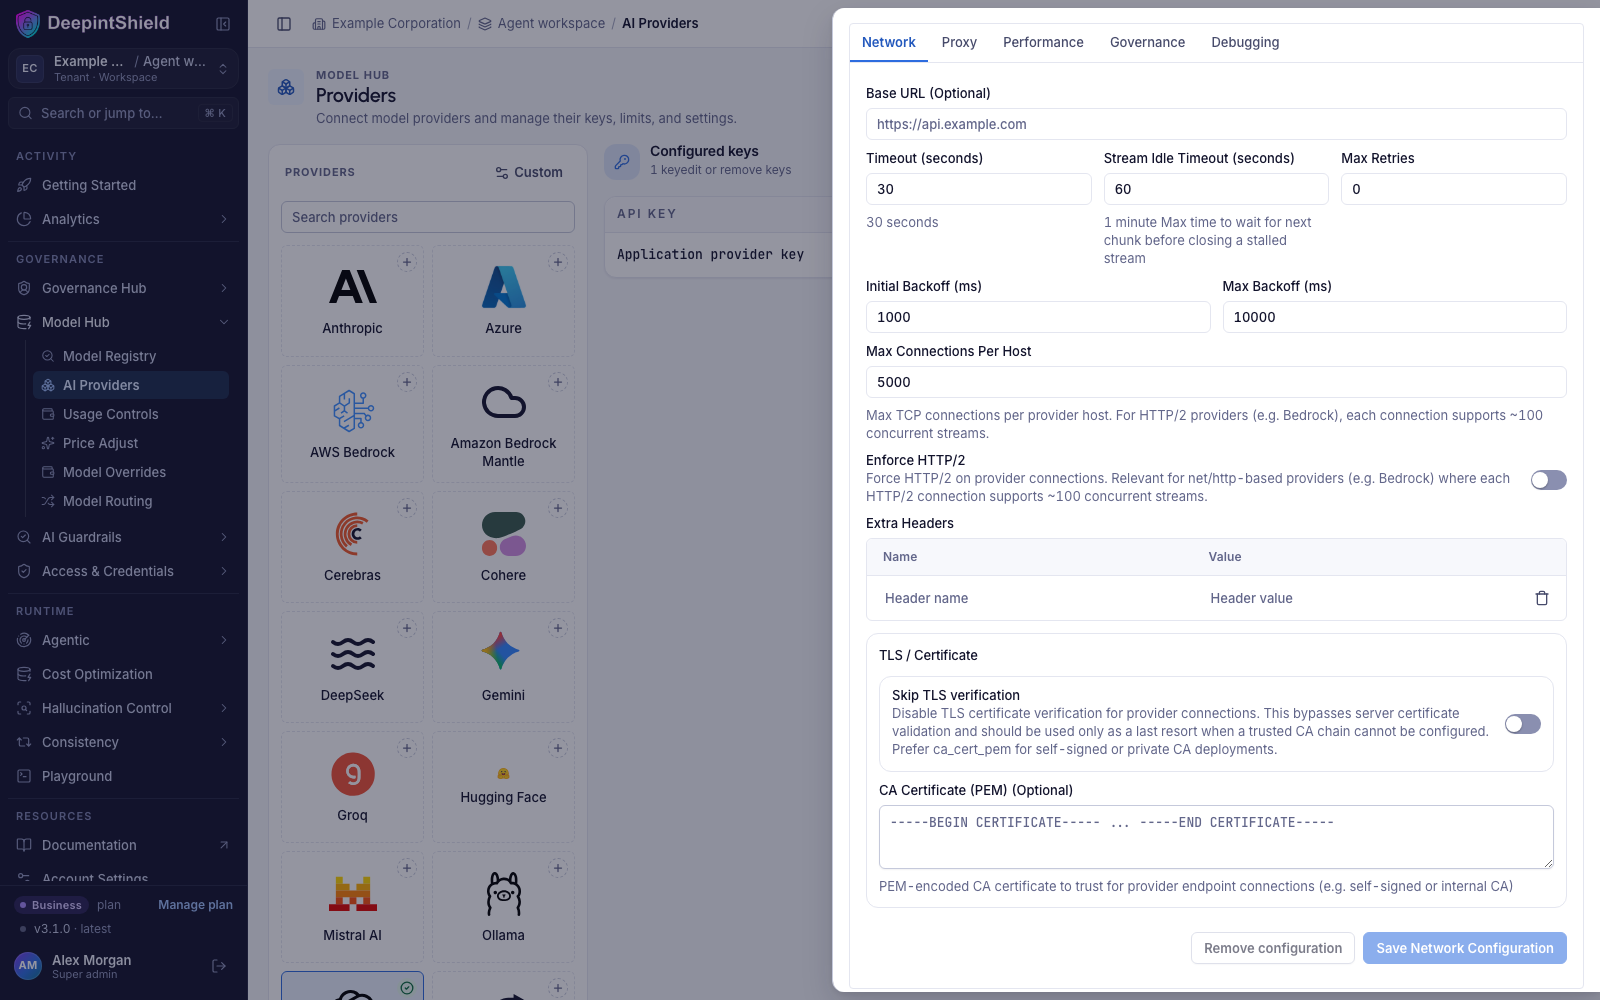
- Navigate to “Model Hub” → “AI Providers” → “OpenAI” → “Edit Provider Config” → “Network”
- Set Max Retries:
5 - Set Initial Backoff:
1ms - Set Max Backoff:
10000ms - Save configuration
Custom Concurrency and Buffer Size
Section titled “Custom Concurrency and Buffer Size”Fine-tune performance by adjusting worker concurrency and queue sizes per provider (defaults are 1000 workers and 5000 queue size). This example gives OpenAI higher limits (100 workers, 500 queue) for high throughput, while Anthropic gets conservative limits to respect their rate limits.
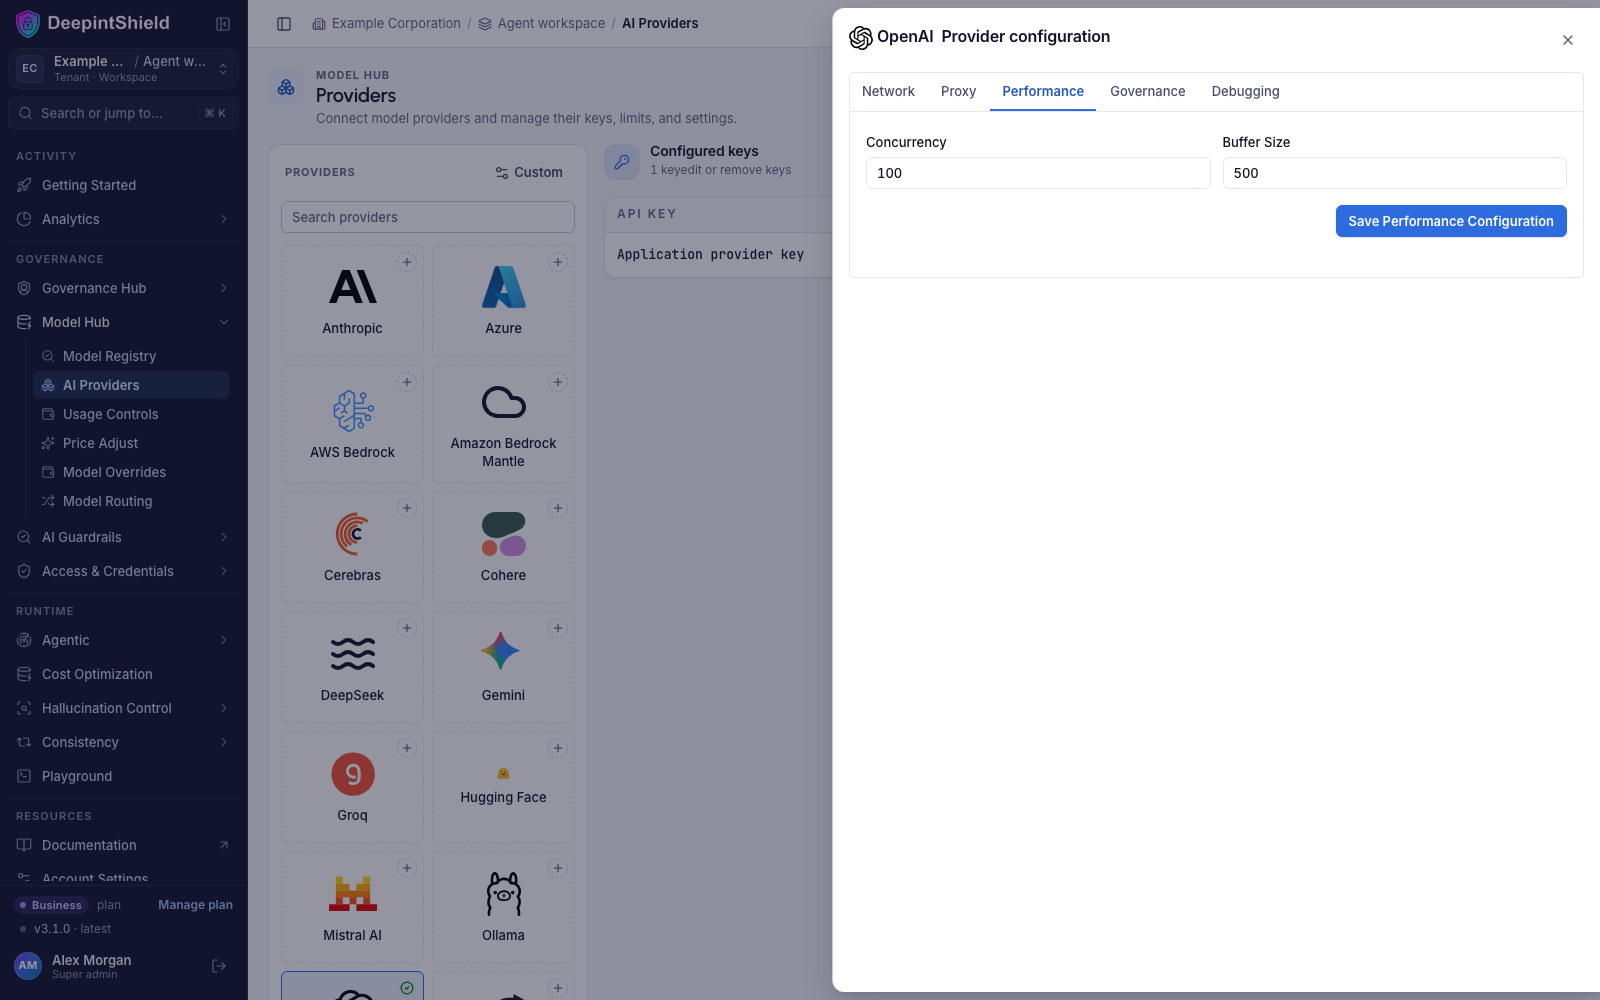
- Navigate to “Model Hub” → “AI Providers” → {Provider} → “Edit Provider Config” → “Performance”
- Set Concurrency: Worker count (100 for OpenAI, 25 for Anthropic)
- Set Buffer Size: Queue size (500 for OpenAI, 100 for Anthropic)
- Save configuration
Custom Headers
Section titled “Custom Headers”DeepIntShield supports two ways to add custom headers to provider requests: static headers configured at the provider level, and dynamic headers passed per-request.
Static Headers (Provider Level)
Section titled “Static Headers (Provider Level)”Configure headers that are automatically included in every request to a specific provider. This is useful for provider-specific requirements, API versioning, or organizational metadata.
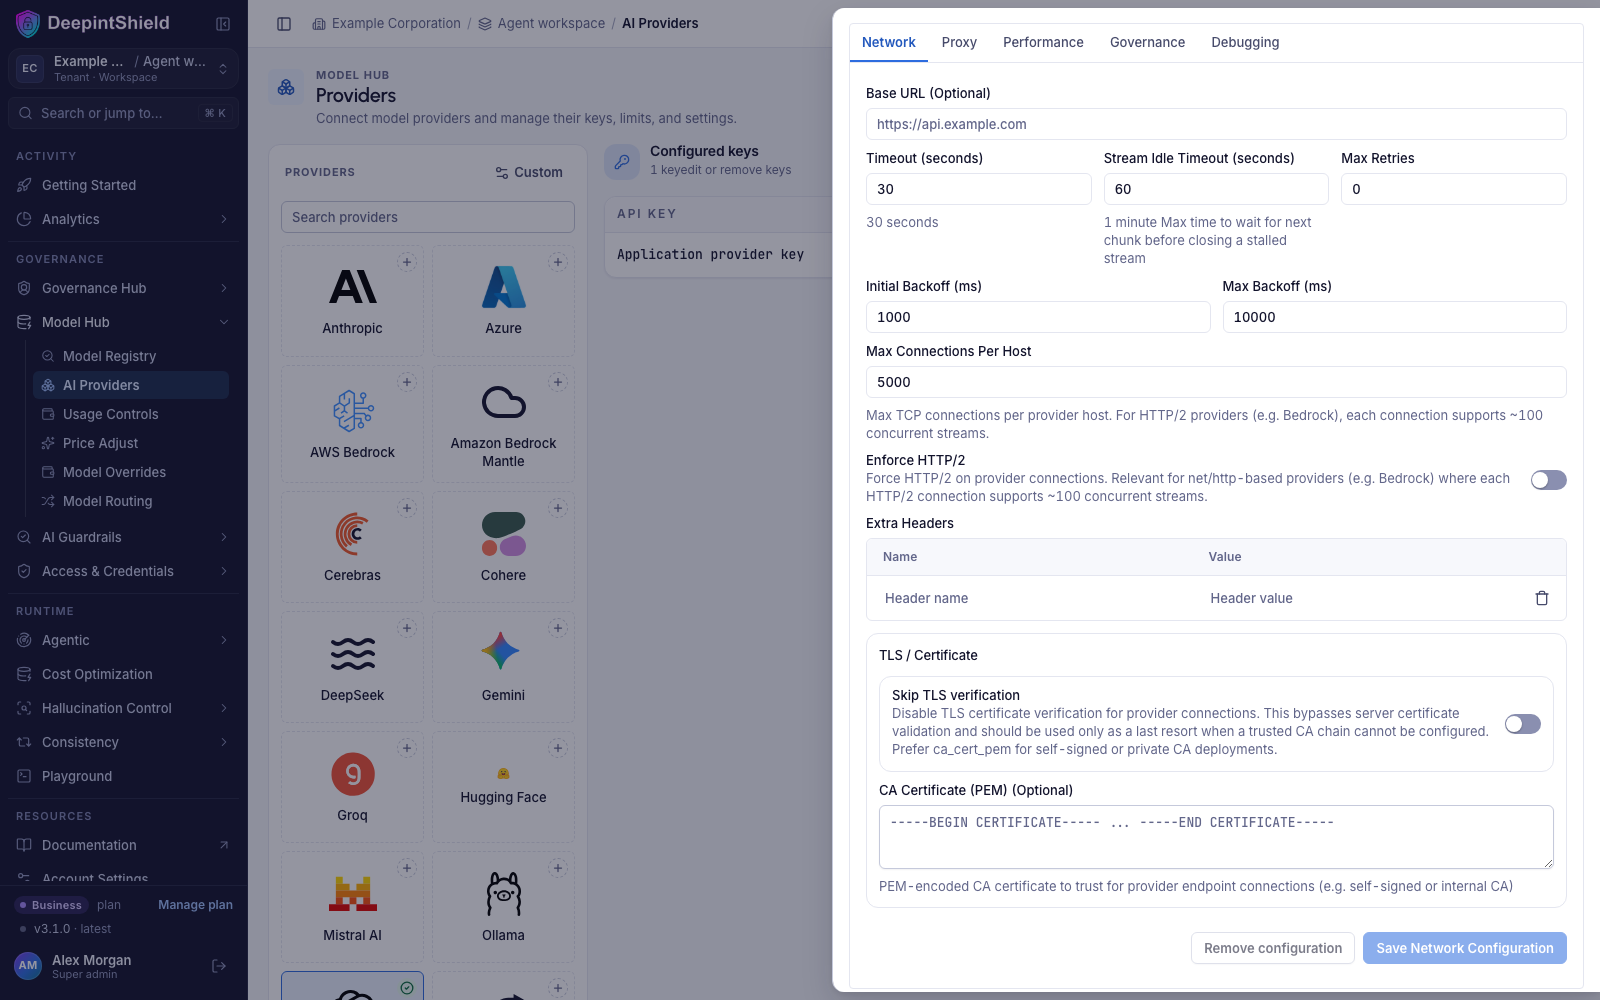
- Navigate to “Model Hub” → “AI Providers” → “OpenAI” → “Edit Provider Config” → “Network”
- Add headers in the “Extra Headers” section (e.g.
x-custom-org: my-organization,x-environment: production) - Save configuration
Dynamic Headers (Per Request)
Section titled “Dynamic Headers (Per Request)”Send custom headers with individual requests using the x-deepintshield-eh-* prefix. Headers are automatically propagated to the provider after stripping the prefix. This is useful for request-specific metadata, user identification, or custom tracking information.
curl --location 'https://app.deepintshield.com/v1/chat/completions' \--header 'Content-Type: application/json' \--header 'Authorization: Bearer sk-ds-your-virtual-key' \--header 'x-deepintshield-eh-user-id: user-123' \--header 'x-deepintshield-eh-tracking-id: trace-456' \--data '{ "model": "openai/gpt-4o-mini", "messages": [ {"role": "user", "content": "Hello!"} ]}'The x-deepintshield-eh- prefix is stripped before forwarding, so x-deepintshield-eh-user-id becomes user-id in the request to the provider.
Example use cases:
- User identification:
x-deepintshield-eh-user-id,x-deepintshield-eh-tenant-id - Request tracking:
x-deepintshield-eh-correlation-id,x-deepintshield-eh-trace-id - Custom metadata:
x-deepintshield-eh-department,x-deepintshield-eh-cost-center - A/B testing:
x-deepintshield-eh-experiment-id,x-deepintshield-eh-variant
Security Denylist
Section titled “Security Denylist”For security, DeepIntShield never forwards the following headers to providers, regardless of configuration:
proxy-authorizationcookiehostcontent-lengthconnectiontransfer-encodingx-api-keyx-goog-api-keyx-deepintshield-api-keyx-deepintshield-api-key-idx-deepintshield-vk
This denylist is applied to both static and dynamic headers (and blocks attempts to override auth or virtual keys via the x-deepintshield-eh-* prefix) to prevent security vulnerabilities.
Setting Up a Proxy
Section titled “Setting Up a Proxy”Route requests through proxies for compliance, security, or geographic requirements. This example shows both HTTP proxy for OpenAI and authenticated SOCKS5 proxy for Anthropic, useful for corporate environments or regional access.
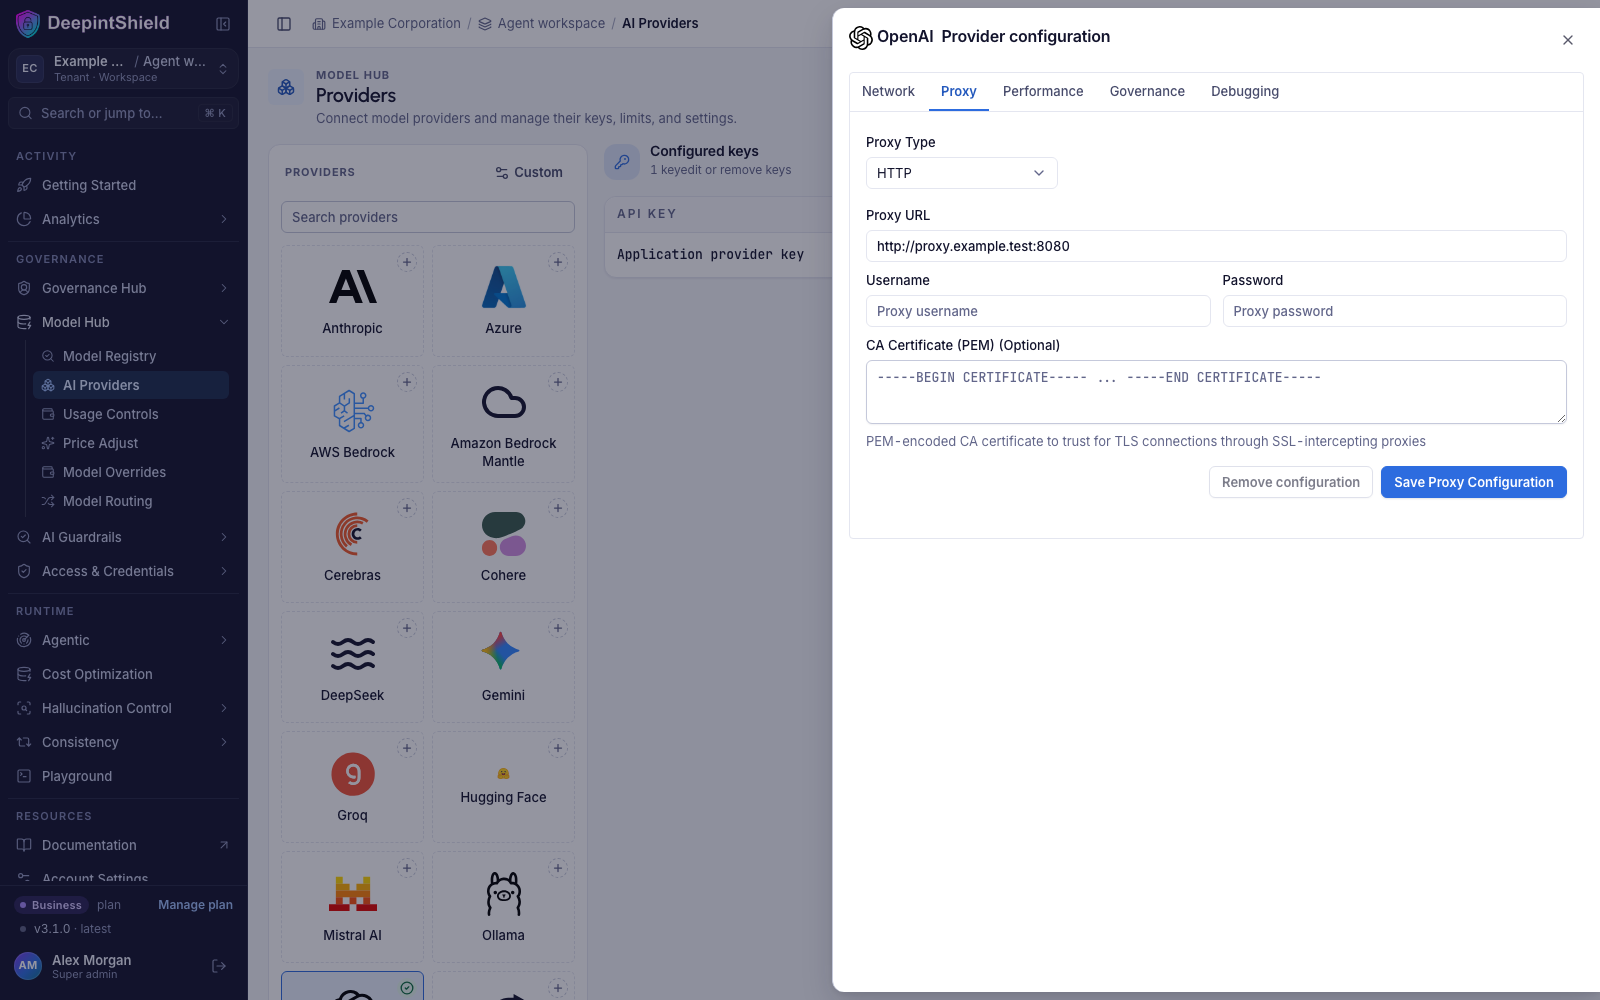
- Navigate to “Model Hub” → “AI Providers” → {Provider} → “Edit Provider Config” → “Proxy”
- Select Proxy Type: HTTP or SOCKS5
- Set Proxy URL:
https://your-proxy.example.com - Add credentials if needed (username/password)
- Save configuration
Send Back Raw Response
Section titled “Send Back Raw Response”Include the original provider response alongside DeepIntShield’s standardized response format. Useful for debugging and accessing provider-specific metadata.
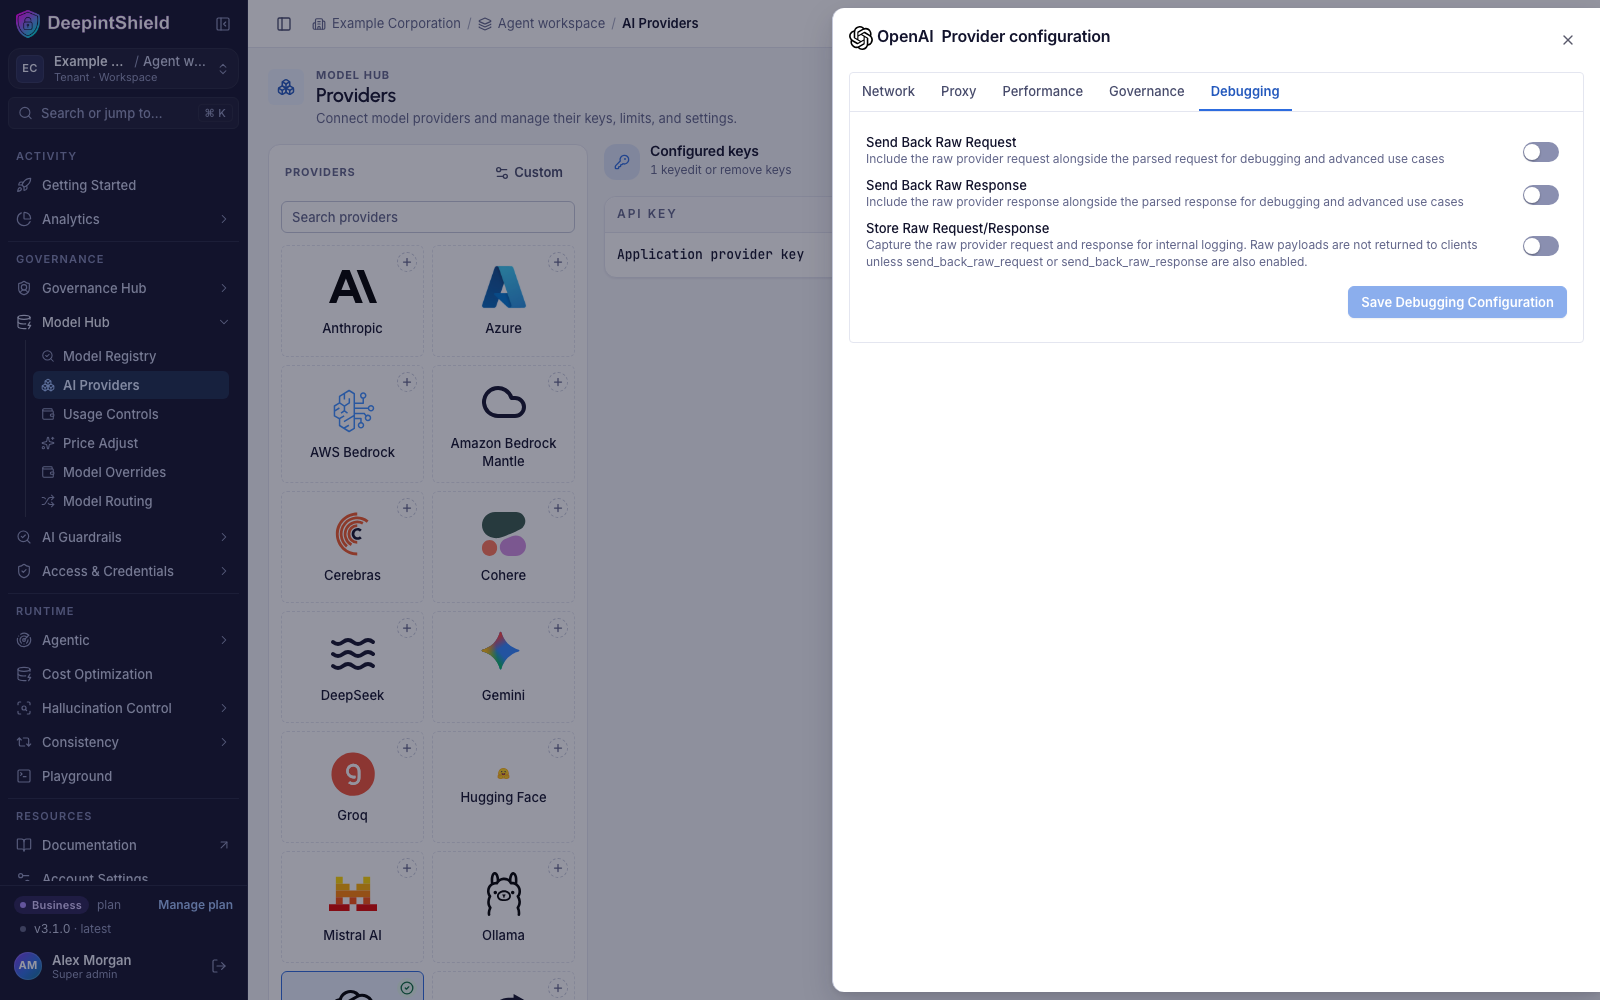
- Navigate to “Model Hub” → “AI Providers” → {Provider} → “Edit Provider Config” → “Debugging”
- Toggle “Send Back Raw Response” to enabled
- Save configuration
When enabled, the raw provider response appears in extra_fields.raw_response:
{ "choices": [...], "usage": {...}, "extra_fields": { "provider": "openai", "raw_response": { // Original OpenAI response here } }}Send Back Raw Request
Section titled “Send Back Raw Request”Include the original request sent to the provider alongside DeepIntShield’s response. Useful for debugging request transformations and verifying what was actually sent to the provider.
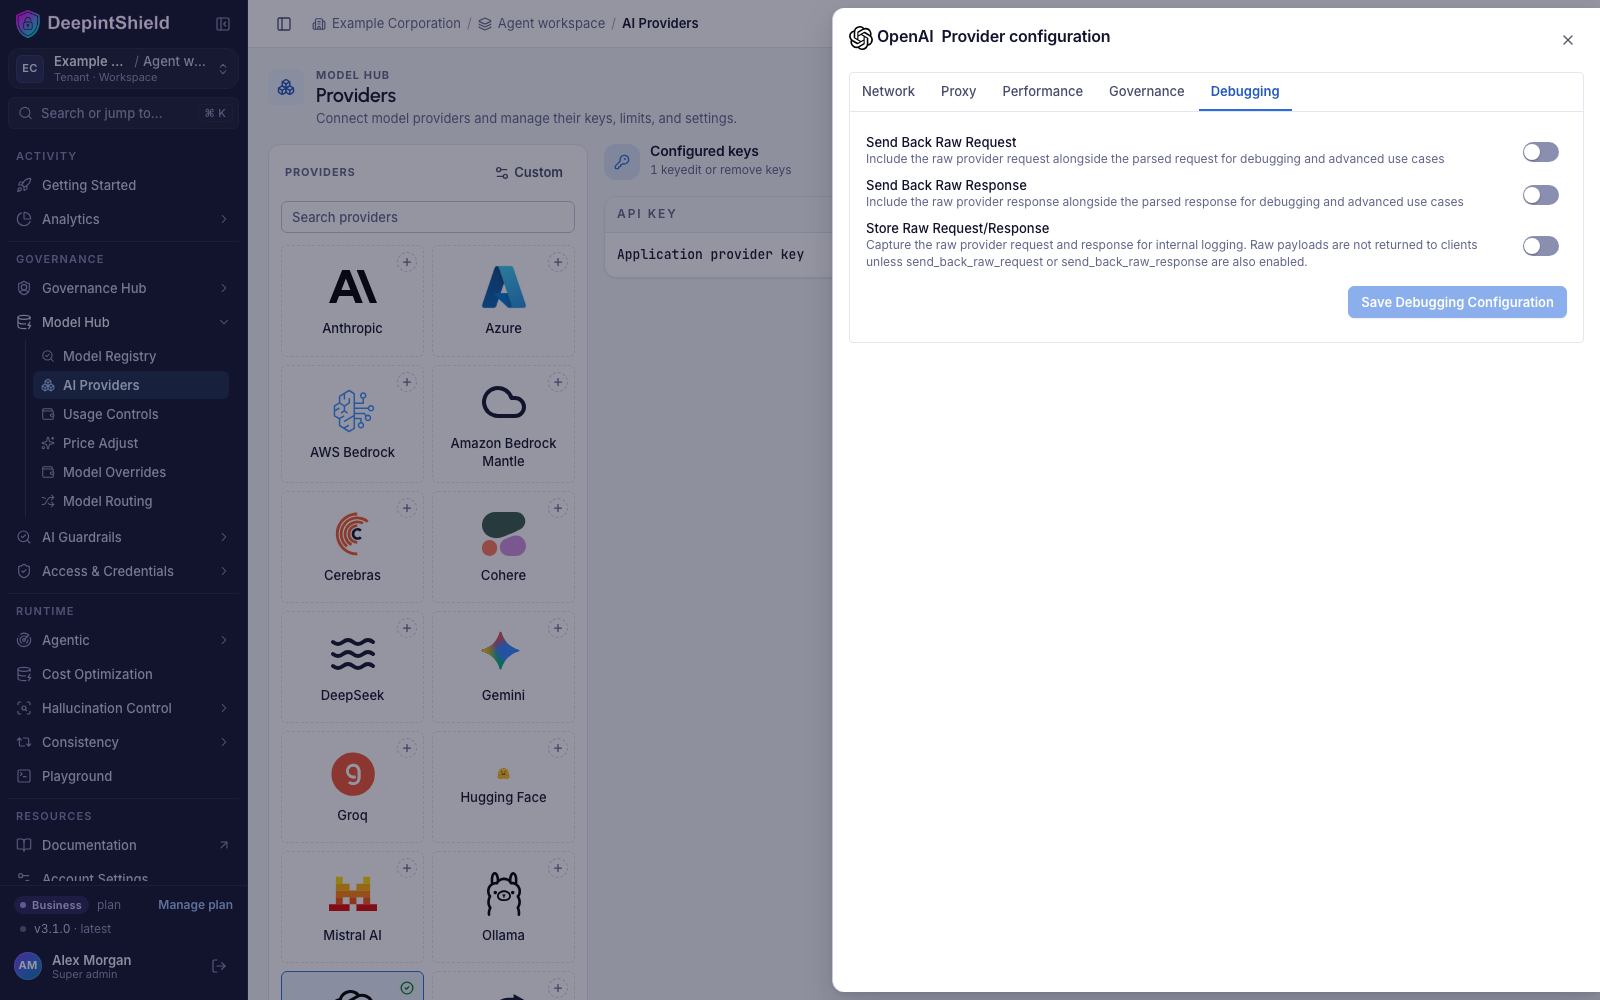
- Navigate to “Model Hub” → “AI Providers” → {Provider} → “Edit Provider Config” → “Debugging”
- Toggle “Send Back Raw Request” to enabled
- Save configuration
When enabled, the raw provider request appears in extra_fields.raw_request:
{ "choices": [...], "usage": {...}, "extra_fields": { "provider": "openai", "raw_request": { // Original request sent to OpenAI here } }}Passthrough Extra Parameters
Section titled “Passthrough Extra Parameters”Enable passthrough mode for extra parameters. When enabled, any parameters in the extra_params field (or provider-specific extra parameter fields) will be merged directly into the request sent to the provider, bypassing DeepIntShield’s parameter filtering.
curl --location 'https://app.deepintshield.com/v1/chat/completions' \--header 'Content-Type: application/json' \--header 'Authorization: Bearer sk-ds-your-virtual-key' \--header 'x-deepintshield-passthrough-extra-params: true' \--data '{ "model": "openai/gpt-4o-mini", "messages": [ {"role": "user", "content": "Hello!"} ], "extra_params": { "custom_param": "value", "another_param": 123, "nested_param": { "nested_key": "nested_value" } }}'When enabled, the extra parameters are merged into the JSON request body sent to the provider. This allows you to pass provider-specific parameters that DeepIntShield doesn’t natively support.
Resource-oriented protocol operations
Section titled “Resource-oriented protocol operations”Provider configuration also controls the account and key used by stored Responses, cached content, Realtime sessions, and OCR. Resource IDs stay bound to the provider account that created them, so multi-key deployments must use an explicit configured-key selector on creation and follow-up calls. Review Protocol operations before enabling these routes in an application.
Provider-Specific Authentication
Section titled “Provider-Specific Authentication”Enterprise cloud providers require additional configuration beyond API keys. Configure Azure, AWS Bedrock, and Google Vertex with platform-specific authentication details.
Azure supports three authentication methods: Managed Identity (the Azure SDK default credential chain), Entra ID (Service Principal), and Direct (API Key).
Managed Identity / Azure default credential chain
Section titled “Managed Identity / Azure default credential chain”Leave API key and Entra ID credentials empty. DeepIntShield uses the Azure SDK default credential chain, which auto-detects managed identity on Azure VMs, App Service, AKS, and similar environments. Provide only endpoint, deployments, and optionally api_version.
Azure Entra ID (Service Principal)
Section titled “Azure Entra ID (Service Principal)”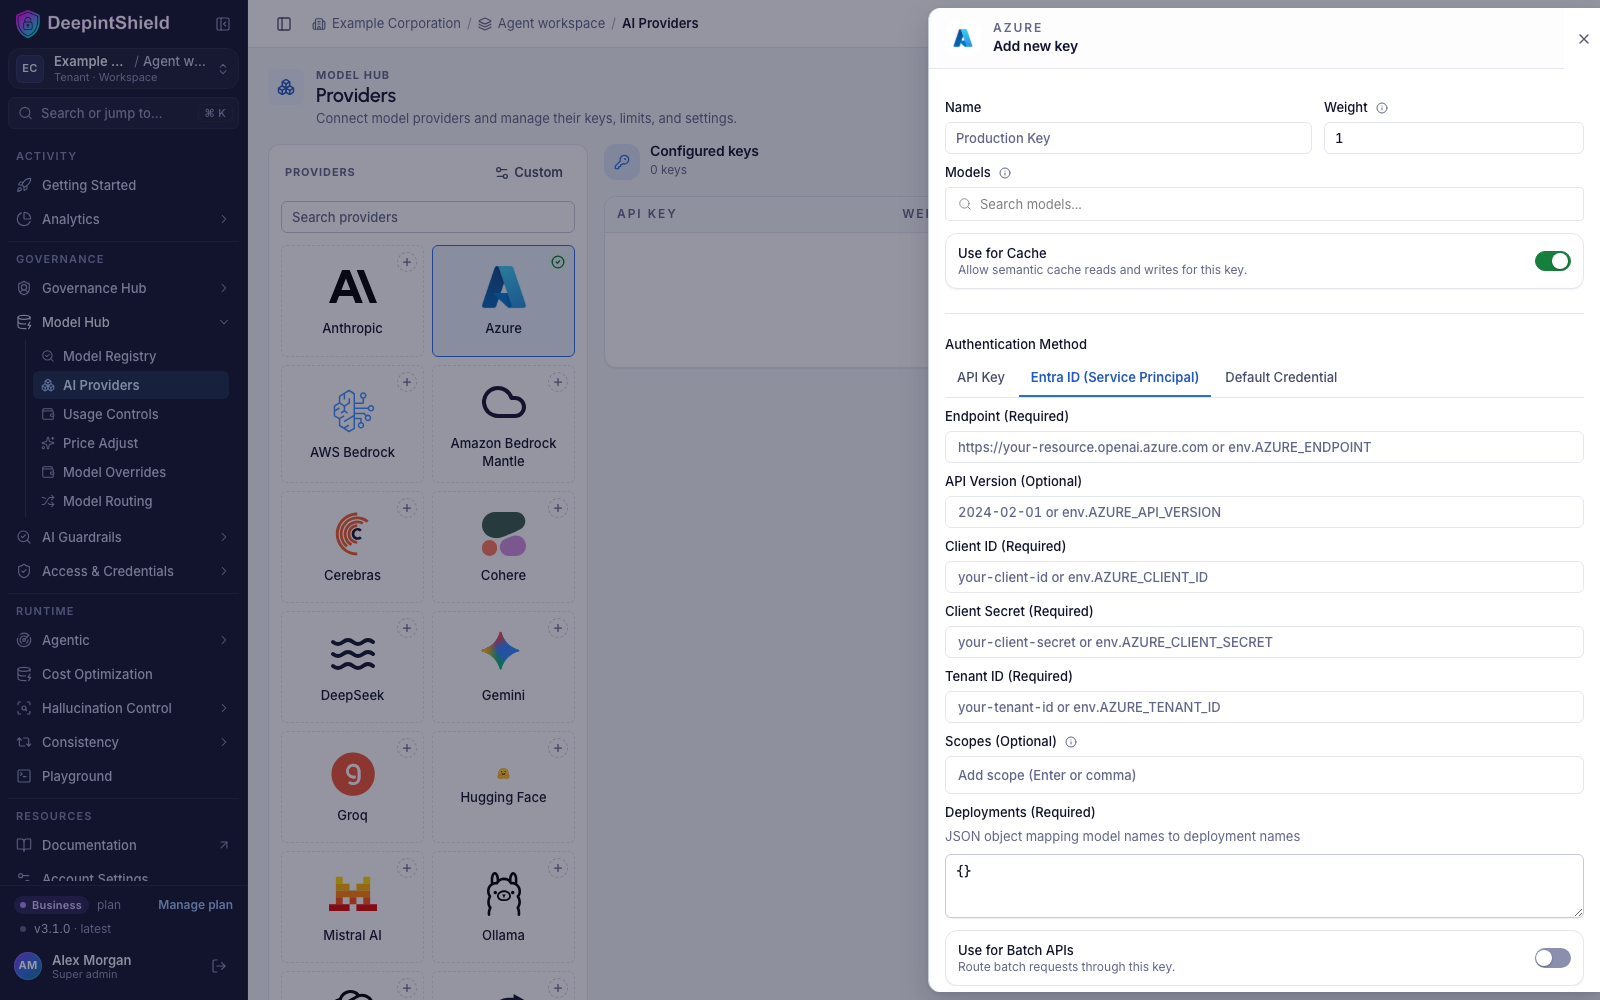
- Navigate to “Model Hub” → “AI Providers” → “Azure” and click “Add new key”
- Under Authentication Method, select Entra ID (Service Principal)
- Set Client ID: Your Azure Entra ID client ID
- Set Client Secret: Your Azure Entra ID client secret
- Set Tenant ID: Your Azure Entra ID tenant ID
- Set Endpoint: Your Azure endpoint URL
- Configure Deployments: Map model names to deployment names
- Set API Version: e.g.,
2024-08-01-preview - Save configuration
Direct Authentication
Section titled “Direct Authentication”For simpler use cases, provide the authentication credential directly in the value field:
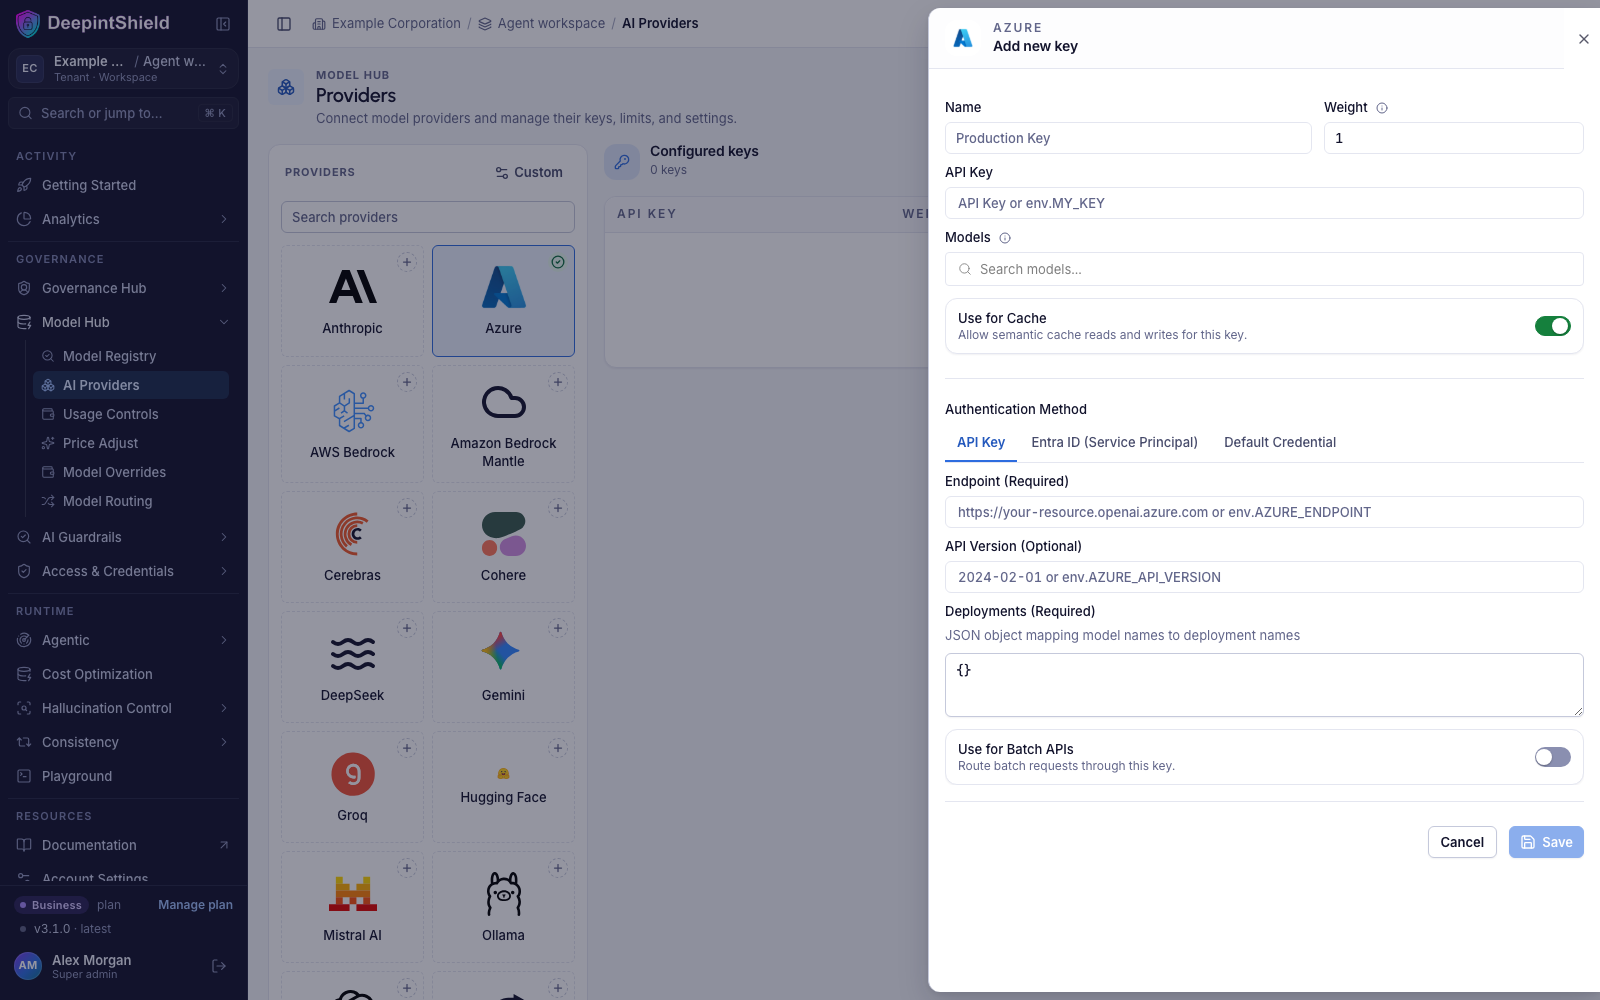
- Navigate to “Model Hub” → “AI Providers” → “Azure” and click “Add new key”
- Under Authentication Method, select API Key, then set API Key: Your Azure API key
- Set Endpoint: Your Azure endpoint URL
- Configure Deployments: Map model names to deployment names
- Set API Version: e.g.,
2024-08-01-preview - Save configuration
AWS Bedrock
Section titled “AWS Bedrock”AWS Bedrock supports both explicit credentials and IAM role authentication:
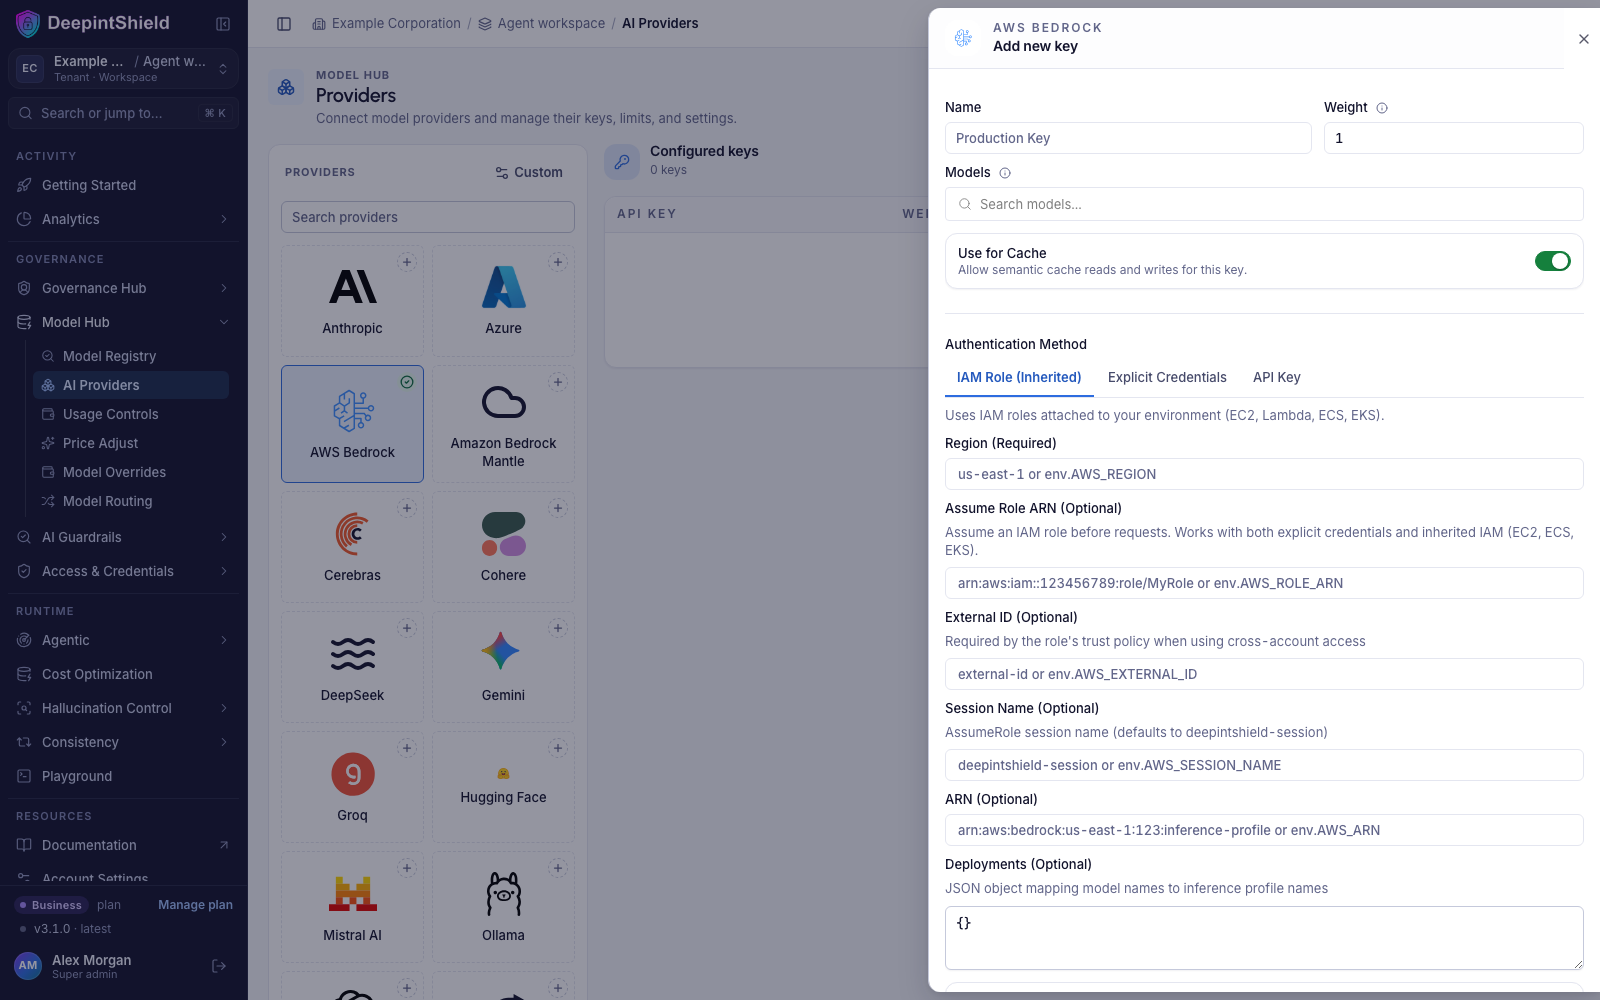
- Navigate to “Model Hub” → “AI Providers” → “AWS Bedrock” and click “Add new key”
- Under Authentication Method, select IAM Role (Inherited), Explicit Credentials, or API Key
- For Explicit Credentials, set Access Key and Secret Key: your AWS Access Key ID and Secret Access Key
- For API Key, set API Key: your AWS API key
- Set Region: e.g.,
us-east-1 - Configure Deployments: Map model names to inference profiles
- Set ARN: Required for deployments mapping
- Save configuration
Notes:
- If using API Key authentication, set
valuefield to the API key, else leave it empty for IAM role authentication. - In IAM role authentication, if both
access_keyandsecret_keyare empty, DeepIntShield uses IAM role authentication from the environment. arnis required for URL formation -deploymentsmapping is ignored without it.- When using
arn+deployments, DeepIntShield uses model profiles; otherwise forms path with incoming model name directly. - ARN vs deployments: Put the ARN prefix in
arnand the model/inference profile resource ID only indeployments- never the full ARN in deployments. See How to Use ARNs and Application Inference Profiles for details.
Google Vertex
Section titled “Google Vertex”Google Vertex requires project configuration and authentication credentials:
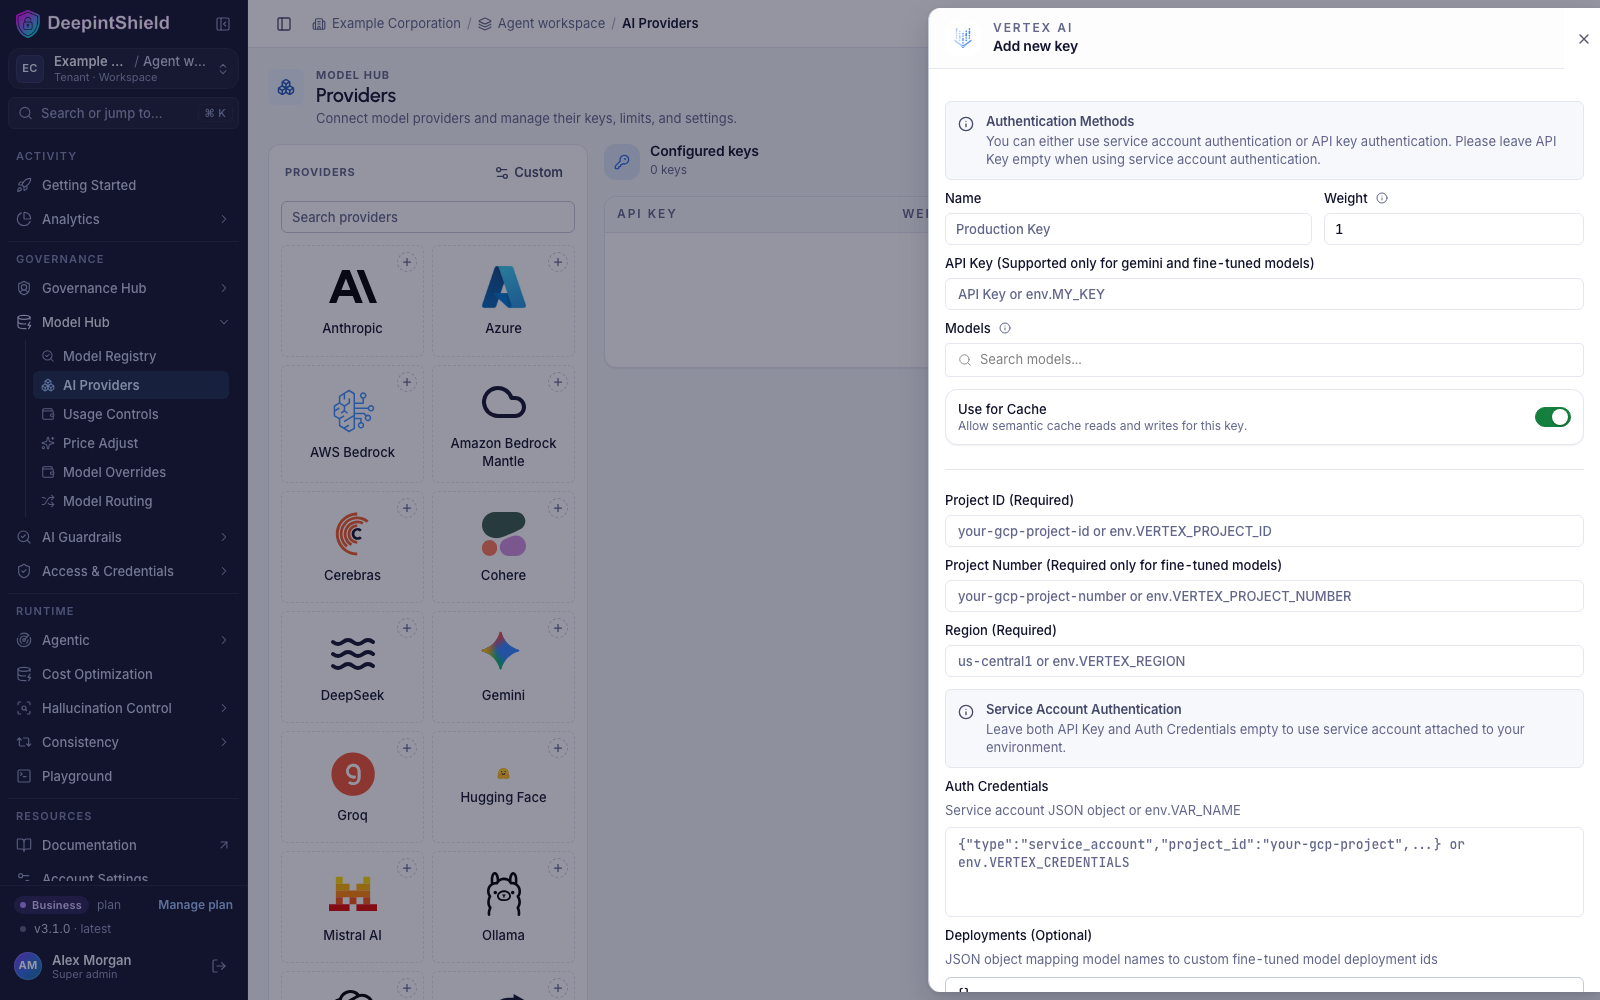
- Navigate to “Model Hub” → “AI Providers” → “Vertex AI” and click “Add new key”
- Set API Key: Your Vertex API key
- Set Project ID: Your Google Cloud project ID
- Set Region: e.g.,
us-central1 - Set Auth Credentials: Service account credentials JSON
- Save configuration
Notes:
- You can leave both API Key and Auth Credentials empty to use service account authentication from the environment.
- You must set Project Number in Key config if using fine-tuned models.
- API Key Authentication is only supported for Gemini and fine-tuned models.
- You can use custom fine-tuned models by passing
vertex/<your-fine-tuned-model-id>orvertex/<model-deployment-alias>if you have set the deployments in the key config.
Next Steps
Section titled “Next Steps”Now that you understand provider configuration, explore these related topics:
Essential Topics
Section titled “Essential Topics”- Streaming Responses - Real-time response generation
- Tool Calling - Enable AI to use external functions
- Multimodal AI - Process images, audio, and text
- Integrations - Drop-in compatibility with existing SDKs
Advanced Topics
Section titled “Advanced Topics”- Performance & Cost - Governance, caching, and observability defaults
- Deployment - Production setup and scaling